9 Easy Facts About Waterproofing Auckland Explained
Wiki Article
Getting My Waterproofing Auckland To Work
Table of ContentsThe Single Strategy To Use For Waterproofing AucklandNot known Facts About Waterproofing Auckland9 Simple Techniques For Waterproofing AucklandNot known Factual Statements About Waterproofing Auckland Indicators on Waterproofing Auckland You Need To Know
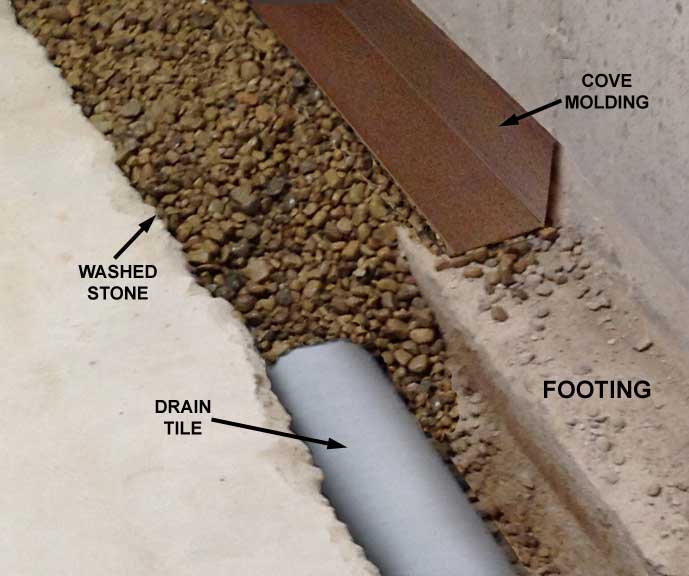
45m (18) in size, are laid in gradual inclines. The joints of these pipelines are kept open. The collecting chambers are created at appropriate periods as well as at turning factors. The collecting chambers are not plastered from the within or outside, to obtain water from the environments. The perforated pipes are after that covered with loose products like chips as well as metal, to develop a filter media.The below ground water finds the method of the very least resistance through the filter media. The water is gathered in the perforated pipelines with the filter media.
The procedure for the underground water container is the very same as that of the cellar, with the exception of the complying with factors. A provision for a pump sump is made, rather of the rain gutter setup. The overflow pipe is located at the wanted degree, to drain pipes out the excess water. Inspect this pipeline for its tightness before the waterproofing job procedure.
The Ultimate Guide To Waterproofing Auckland
If white or tinted joints are called for, then the grey cement joints are raked, and also white cement or color concrete slurry is used with a tiny travel over the surface for joints of a matching shade. The surface is again cleansed with sawdust. to get rid of excess white or color concrete staying with the glazed china mosaic surface.The base and accelerator are mixed with each other in percentage by weight. This mixed substance is then used with a spatula or handheld weapon devices any place needed. Bonus material is reduced off with a putty knife as well as a smooth vertical joint is produced. Since the sealer is very pricey, use it.
For water-proofing of the straight development joint, arrangements need to start from the R.C.C. phase of the structure. Upside down beam of lights are taken to the area, for the development joint, side by side.
Socketing (pressure grouting)' is a treatment to grout the concrete slurry by stress into the permeable concrete member. Following a series of the job treatment.
3 Simple Techniques For Waterproofing Auckland
Fix 25mm (1) G.I. outlet over the metal, utilizing abundant cement mortar around the socket as well as metal. If the waterproofing work treatment is not done appropriately, it can pose troubles. Repair work and also maintenance of waterproofing can verify very bothersome for the user.The joint between the (tee) of outer vertical stack and P.V.C./ C.I. piece. The joint in between the flushing pipeline and also I.W.C pan. All these joints should be sealed with the proper sealant, at the corresponding phases throughout the implementation of the job.
Load all the voids in the floor covering of W.C. with cement. Examine the joint between the P-trap and also L.W.C. frying pan from above, by placing a hand into the trap. Seal this joint with M-seal, if it is partially open. Inspect the joint in between the flushing pipe as well as L.W.C. pan by breaking just one ceramic tile, fitted precisely over the junction.
The Best Strategy To Use For Waterproofing Auckland
Open up the "Tee' of the vertical stack from the outdoors, with a ladder or zula and observe the joint of C.I. item as well as Tee' with torchlight and seal it properly. If leakage still persists, break open the hidden flushing G.I. pipe as well as inspect if it is water tight. Replace the dripping pipe/G. I.
If this does not stop the leakage, break open the total device as well as examine the joint at the P-trap and also C.I./ P.V.C. pipeline. Do the brand-new waterproofing job procedure entirely with utmost care. Generally, 90% of leaks stop, if we anonymous bring out the repair as specified above, in the initial four points.
like the container drains, for their water tightness. This can be inspected by stopping the operation of the clean hand container and maintaining these lines entirely dry as well as operating them once again after 4-5 days. If the leaks dry and start, the resource is through these lines. Break open up the lines and also click now locate the source as well as change the affected part.
Damage open the washroom waterproofing job procedure and re-do it thoroughly. A typical and successful approach for treating minor leakages is to deal with the damaged part with cement slurry.
Not known Incorrect Statements About Waterproofing Auckland
Inspect the damaged part of the balcony using a wood club and also check if it has actually peeled off. If the leak is from the corners or from the parapet wall, after that fill up all the cracks after breaking it open with cement.Some chemicals are suggested for combining with cement, at the time of concreting. The traditional technique of brickbat coba is still content one of the most prominent of water-proofing approach in India. Waterproofing compounds are usually available in powder as well as fluid type, as they serve the twin function of waterproofing job treatment and warmth protecting.
Make sure that the socketing is done before the base coat work. Guarantee that all the brickbats are well-soaked in water, prior to usage.
Guarantee that the water-proofing compound is mixed in the mortar, for every stage of work. The topcoat must be brought out in one stroke, without any type of joints.
Report this wiki page